Showing posts with label advertise. Show all posts

Saturday, October 17, 2015

How to: Thunderclap It

Thunderclap is an awesome platform for advertising your book release, cover reveal, award nominations or a sale.

How do you do it?

First, you have to decide whether you want the free or premium version. What's the difference? It's in the detail. You get more options and more control with a premium account, as well as being able to reach a wider audience. The free account gives you most of what you need, but it depends on how much money you have to spend and how widely spread you want your campaigns.

Free vs Premium

Click here to learn more.

~

Start here: Thunderclap.it

Sign up under the Login/Register option and we'll get started.

Here's your homepage, where you'll end up when you sign in/register - 


Here, in the top corner, is where you'll find your Profile. If you're just staring off, you'll want to go here first. If not, you can skip ahead to making your first Thunderclap, further down the page.

At the bottom of the page, you'll see a list of Trending campaigns, campaigns ending soon and you can also select by category, from a drop down menu.


~

To start, we'll take a look at your Profile and how to edit it and how it will look - 


This is where you'll link your Twitter and Facebook profiles. The Twitter one is most important, because when your Thunderclap is approved and someone signs up to support you, they're given the option of following you by e-mail and getting updates on your Twitter account. Also, anyone who views your Thunderclap campaign will see your Twitter box on the right, giving you the option of following you that way. I'll show you an example of that later.

For now, make sure you fill out your details appropriately. This isn't for your Thunderclap campaign, but it will save you time when you make every campaign under your profile.

~

Next, let's look at what else you can click above. The My Activity box shows you all the campaigns that you've supported, your lifetime stats and how many Thunderclaps have been made in a glance.

Next up is your Thunderclaps page. For newbies, this is what it will look like.


 Then, if you scroll down, you'll see what it will look like once you've run a few campaigns.
This gives you all the information you could want at a glance. Now, if you've got the free version, you'll only get so much information under Stats, as shown below, but if you've got any of the more premium accounts, you'll see so much more.

I'm covering the free version, because it's the most cost-effective for Indie authors who might not have a lot of money to splash around. (Like me. lol.) Most of the stats you'll are shown as above - % supported, social reach and the date. Anything shows up as below.


~

Now, let's move on to making your first campaign.

You can take a peek at pre-existing campaigns, to get a view of how it's done, or you can go ahead and get started. I'll talk you through everything here.

Page 1

Most of the pages are self-explanatory, but I'll go through them anyway. This part is all about you, so that your supporters can see who you are and what you do. Keep it short and sweet, so that it's something people can read at a quick glance, without having to spend forever trying to find out what you do.

Here's my usual:

"Elaine White is a Scottish author, who writes paranormal romance, crime and MM romance."

Short, sweet and it lets people see where I'm from, what I write and what my interests are all at once.

Next - about your campaign


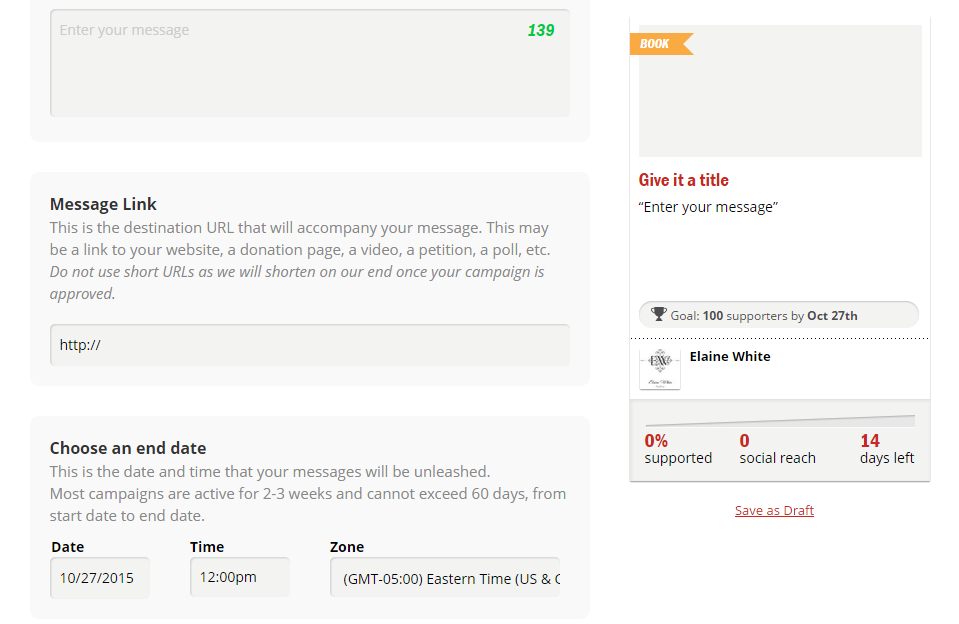
This is the important part. See that box on the right, with the Book tag? That follows you, as you scroll down the page to fill out the rest of your information. It gives you an update with each new piece of information, to show you an example of how it will look.

As you can see, your Title has a character limit. 30 characters is NOT a lot, so get to the point. This would normally be where you'd add your tagline, but even that may be too long. I tend to play around with options, until I get it right. Sometimes that takes a while, but it's best to get it right. The one thing you DON'T want is to have your message cut off, because it's over the limit. Since I've never tried this, I can't tell you if it would post or warn you that it's over limit, but it's best not to tempt fate.
Beneath that, you have to select your category. Now, this isn't like an Amazon category, where you can pick 2 or 3 or even pick a sub-genre. If it's a book, say book. If you're a musician, say Music. You don't want to be advertising yourself as the wrong thing, because it will get confusing for supporters. Also, your campaign will show up on Thunderclap's home page, right down the bottom, where the give you a drop down menu to view campaigns by. (see above)

Now, onto the message. As with your Title, this has a character limit, so make it punchy and feel free to add hashtags, if you want. Sometimes they can let you say a lot without many characters. But also make sure that your message looks nice, isn't in text speak and inspires people to click that link.

Your message link is tricky. If you don't have your final buy link, then feel free to add a general link - website, Amazon author page. You can make a SmartURL with a link to all your international Amazon profiles (see here on how to do that) or just insert your US/UK Amazon profile. The key thing here is that once you have your buy link - as long as its before your Thunderclap goes live - you can update it! Which is awesome!

Sometimes Amazon takes a while to load a book, especially if you've had a last minute update before release day, because of edits or whatever else. For this reason, when you reach the End Date option, again try to make it well timed. If you're not sure the book will go live on release day, then make your Thunderclap end a few days later or a week or two.

~

So, how does planning your end date work?

Your end date is when your Thunderclap will go live. Your post will NOT repeatedly post between your start date and end date. It will only post ONCE, at the time on the day you specific. So, if you want your post to go live at 12pm on the 1st of December, then choose those options.

When it says "Most campaigns are active for 2-3 weeks", that refers to the time it takes to gather your 100 supporters. But we'll go into that more later.

Now...REALLY important...your Thunderclap will NOT instantly be available to share. Once you've clicked Create and Continue, it will be submitted to Thunderclap for approval. This is generally just to make sure it's nothing obscure or porn related. I've seen a lot of erotica books been passed, so as long as you're sensible, it shouldn't be a problem. It generally takes 1-3 days and some are quicker than others for being approved.

For this reason, try to give yourself AT LEAST 2-3 weeks to gather your 100 supporters. I generally give myself a month. This gives you time to share your link (provided in your confirmation e-mail) to a dozen different social media sites over time, share it in the Thunderclap group on Facebook, which is a great way to get supporters. It's all about sharing Thunderclaps and supporting other people in return.

~

Once you've filled out that page, we move onto the next.


Your supporter goal is important. This is how many people you'll need to get your campaign from Active to Completed. Like the message says, Be Realistic, so opt for 100 for your first campaign. If, later, you've consistently reached over 250 supporters on a 100 supporter campaign, then you can move your next campaign up to the 250 supporter limit. If not, you'll generally find that 100 is enough. It's hard for an individual author to get more than the 100 supporters needed for the first level campaign.

Next up, you need a campaign photo. This can be as tricky as the Title. The image is shorter than a FB cover photo, so you might have to play around with a little or go to Picmonkey (how to post here) and use the Create and Custom options to make your canvas 600 x 280. That will give you the image size and you can use layers to get your pictures added onto the canvas.


Now, you get to add the blurb or your story, or a synopsis into the "Edit Your Story" box. This one doesn't have a word/character limit, so go ahead and put in whatever you want. Feel free to add your website and social media links at the very bottom, because there won't be anywhere else to add them.

If you've updated your Profile, the E-mail and Twitter boxes will automatically update.

When you're happy with how your message looks in the box on the right, click the Create and Continue.

Now...REALLY important...your Thunderclap will NOT instantly be available to share. Once you've clicked Create and Continue, it will be submitted to Thunderclap for approval. This is generally just to make sure it's nothing obscure or porn related. I've seen a lot of erotica books been passed, so as long as you're sensible, it shouldn't be a problem. It generally takes 1-3 days and some are quicker than others for being approved.

This is a great reason to give yourself a month to gather your supporters.

~

After your Thunderclap has been approved, this is a version of what you'll see.


This is what everyone will see when they click on your link to support you. When they get here, they can choose to support ONLY with Facebook, Twitter or Tumblr, or they can choose a combination of them or all three. That's up to your supporters. I have all three social media sites, so I always support with all 3, but other people might not have a Tumblr or Twitter site etc.

Then, once you've shared this and reached your 100 supporters, this is what you'll see.


~

The great thing about Thunderclap is that you get a daily e-mail to tell you how many supporters you've reached overnight/during the day and how many more you need. That way, if you spend a day or two getting no supporters, you know to post it again and ask for more shares.

Then, once you've reached your 100 you get an e-mail to let you know it's "Tipped", in other words, gone live.

Feel free to keep advertising/sharing it after you've reached your 100 supporters. It will not show as Completed until it's gone live. That means you can keep gathering support as long as you haven't reached your post date yet.

~

CONGRATULATIONS! You've now completed all the steps for how to use and make the most of Thunderclap.

Monday, September 21, 2015

The Importance of Taglines

When you release a book, you often have to advertise on sites that have word limits, e.g. Thunderclap, Hootsuite and Twitter.

How do you do that, while adding everything you want to say?
The easiest way is to use tags and a dedicated tagline for your novel. The key is to keep it simple.

How do you do this?
So you want the tagline to represent the main focus of the story, ask a question or hint at a mystery. If your story is a hot, sexy 'Will they or won't they?' then you want your tagline to reflect that.

Here are some examples from the Simply Sexy Reads Catalogue:

Courage in the Kiss - All she needs is the courage...and one kiss.
Touched by a Vampire - Would you sacrifice everything for an eternity of love?

~

How important are taglines? Well, turn on the TV and watch any advert. For every company, there is a short slogan - their version of a tagline.


Now, be honest. Is you hear "I'm Lovin' It" you think of McDonald's. If you hear "Every Little Helps" you think of Tesco. For Loreal, "You're Worth It".

Imagine if you could do that with your book. Imagine if you were able to add your tagline or slogan to a poster and instantly have people recognise that it meant your book.

Recognise these?

"May the odds be ever in your favour?"
"After all this time...Always."

Just because your tagline is a quote, like these are, doesn't make it ineffective. It makes it magical. These two quotes have marked an era of explosive YA novels being turned into movies. People have tattoos of these quotes, jewellery, cushions, iPad cases, posters and more, because these quotes are so iconic.

Now, the original books didn't have a set tagline, but they don't need them. Everyone in the world and their mother knows Harry Potter. They don't need a slogan or tagline to sell, but we can't all be that lucky. And, honestly, taglines and slogans make you stick out. They give you an edge.

~

Look at these. Image a buy link at the end and tell me which one makes you want to know more about the book.

1

Courage in the Kiss
Coming Soon to Simply Sexy Reads
2015

2

Courage in the Kiss
All she needs is the courage...and one kiss.
Coming Soon to Simply Sexy Reads
2015

And, sure, you can say that adding a poster with a quote or teaser or your slogan would make a difference. True! Posters and pictures grab people's attentions, better than a paragraph of text. BUT!!! Sometimes, all you have is a space for text or you're on your phone and can't access your posters. This is the perfect time to use the slogan/tagline to your advantage.

~

Don't underestimate the power of advertising. Everything that can be sold needs to be advertised. Everything that can be sold needs to have a marketing strategy and a "grab" for the audience. Your tagline and the image you want to portray of yourself will be your grab.

For more tips on how to advertise yourself, check out our previous post "How to Affectively Advertise Your Book".

Sunday, September 13, 2015

How To: Create An Animated Gif

With Facebook now allowing you to use Gifs on comments and posts, I thought it would be a good idea to cover how to make them, for all those inquisitive minds. Now, there are LOTS of ways to do this, so I'm going to cover the way that I did it, that I know works. But there will be other options out there, if this doesn't work for you.

Gifs are a great way to advertise your book, especially if you do them right. They have more 'Wow Factor' than a poster, but are also more fun to play around with. You can say more with a gif than a poster, with a surprise factor added in for good measure. Generally, my advise is to keep it simple and only change the text. That's what I'll be demonstrating today.

Also, refer to the post on Author Legalese, if you want to double-check copyright rules about pictures and text you'll be using.

~

First, you'll need a picture. I suggest forking out the cash to buy one. You want top quality, but if you can't afford it, you can usually get a great image for free, if you look in the right places. Check out our How to Effectively Advertise Your Book post, for places to find images.

Once you have a picture you like, upload it into PicMonkey. Again, link in the above post. Here, you'll want to get the colours and effect however you want it. Me, I used an image that was already perfect (which was bought) so that I didn't have to play around with it.

Next, you want to add your text. Check out the examples below for an idea of what you can do. Once you've decided, add the first part of the text to your image. Find a font you like and either keep it consistent, for a seamless look, or change it up on purpose, for the second example.

You'll have to save the image, after adding each part of text, so that you then have a set of the same image with different text, as below, in my example:


In total, I have 5 images of the same picture just with variations of text.

Now, you upload into GifMaker.Me

When you click the link and go to GifMaker, you're automatically led to the page where you can begin making your gif, so there's no faffing about, trying to find the right button. It's super easy.

This part is really simple, once you know how to do it right. Make sure you've named your pictures above in the order you want them to appear. I went with a really simple 1-5. Then, click on this box here - Upload Images -, to select the images you want in your gif:


You can select all of them at once (example: all five) It's best to do them all at once, so that you don't get them in the wrong order. You can click and drag the images, to rearrange them, but if you get in a real mess, it may be better to remove them and start again.

Upload your pics and then, you'll get an example of what it will look like in the big white "Preview" box on the right. This is REALLY important, because you need to see how it looks before you hit "Create". Why? Because it might be too fast. Depending on how much text you have, you want your gif to be readable, so for a text like mine, I went for the 1650 milliseconds, under "Animation Speed". LEAVE the canvas size at 100%. That ensures that you don't have any white space, though it looks like you will, in the Preview box. That's because the preview box is set to a specific height and width, but your gif will take on the 100% size of the picture you upload. Which is why it's so important that you only use one image rather than many.

Now, you can move on. Here's Step Two:


Here, you can decide whether to leave your gif on repeat, so that it's always playing or only to play it once. Totally up to you.

The next neat little thing is that you can add a Music URL. Now, there are links to YouTube's audio library in the Advertising post, but I've yet to find a way of actually "listening" to my gif, that I added music to. If you find a way, let me know. I want to hear it. :)

Once you've done that, you're done. Click "Create GIF Animation" and it will pop up with a link to download it, just below these black buttons. It will automatically download to your Download folder, then all you have to do is rename and post it wherever you want. Voila!

Congrats! You now have your very own animated gif, to advertise your book. Or, you know, just for fun.

~

Want to see how it's done? Mine was an experiment, but Elizabeth's was done by a professional, who knew what they were doing. See the difference between the two and how you can make your own, with no prior knowledge of how to do it. You can also play around with adding tags, like Elizabeth's has, for Amazon or a Title logo. What you add, is up to you.

This is my gif for Courage in the Kiss:


This is a gif that an author friend had made, that I really love, too. It's simple and effective:


Saturday, September 5, 2015

How to: Effectively Advertise Your Book

Guest Author: Elaine White
This article is by Elaine White. All opinions are her own.
~
So, you have your book written, submitted and signed to a publisher. That's all you need, right? At least, until it gets published. Wrong! Dead wrong!

Once you've been accepted to a publisher, and BEFORE, that's when the real work starts. It's okay if you're a careful person and you don't want to advertise yourself as an author until you have that first book published. It's okay if you've never let anyone else read your writing, until you submitted to a publisher for the first time.

But now that you're ready to release a book, you need to start putting yourself out there and building your brand. At first, you'll be all over the place, not sure how to label yourself, not sure what your 'theme' or 'style' will be. That's okay, too. You'll figure it out along the way. We all do.

No matter how many times you've been knocked back before, you've made it now. Take a minute, take a deep breath and a sigh of relief. Now, get to work.

First off, you NEED an author page on Facebook. This is non-negotiable. I know, you might think that you're way better acquainted with Twitter or Google+, but Facebook is one of those invaluable resources for authors. If you're not on it, you're missing out.

Before we get started on what to do, let's look at how to do it best. For that, you'll need to read our other post 'Author Legalese'. Knowing the legal ins and outs of how to promote yourself is VITAL. Trust me, I've seen many, many authors ignore and even publicly violate the rules about using Celebrities to promote your work (a big DON'T) and ignoring the fact that having a unique backdrop/logo or model to promote your work can be what puts you on the map. (Done legally, this is a major DO.)

Now that you're read that, let's get onto the fun part. How to do it.

~

Keep your Facebook page exciting. You can use Facebook's scheduling feature to make sure that there's always something posting on your page, whether you're going to be online or not. I generally schedule months ahead, so that I don't have to worry about it for a while. I will add updates, when someone exciting/important happens, but I keep a note of when my 'scheduled' posts run out and spend 1 day preparing a few more months of coverage.

Another thing you'll need is a profile picture. You can use a picture of yourself, as it's your page, but make it professional. Don't use a holiday snap, a personal family photo or something you shot in bad lighting in your house. It doesn't look professional. You don't have to get paid photographs taken, though that's a bonus that's well worth the money. You can take a decent author photo at home, with your camera or phone, as long as you don't have personal things in the background and the quality is good. Something simple will work just fine.

Also, you'll need a cover photo. There are some great options available on Facebook, with these apps. These are fine, if you want to do something generic, but it's better if you can make it personal to you, your brand and your books. Still, here are the ones on Facebook:

Top Cover Photos

Cover Photos

Profile Cover Photos

Facebook Cover Photos

If you want to make something personal to you (Highly Recommended!) then try using one of these sites, that are really easy to use and you can personalise them with your own photos. You might need to use some of the sites/methods explained below (in the Teaser Poster section).

PageModo

Pixteller

PicMonkey

The Pixteller link will take you straight to the Facebook Cover page, as will PageModo. However, on PicMonkey, if you hover over 'design' then it will show options for blank pages and one is Facebook Cover. You want that, because it's specifically designed to the right height and width.

Go have fun. Explore. Try out looks, effects, fonts and designs. Then, once you have one you like, make it your Facebook Cover photo. I change mine every few months, depending on what's going on in my life and writing world. Sometimes, if there's a really big event that relates to my writing, then I'll make a special banner. If I have a new release, I might change my banner to reflect that and build anticipation. Mostly, I keep a general one. Here's an example of my most recent one:


~

You'll need a kick-ass cover, but unless you're self-publishing, then your publisher should have a cover artist/designer who will deal with this. But, fear not. If you're doing this all by yourself, then here's a few awesome cover artists that do beautiful, one-of-a-kind covers at reasonable prices:


~

So, you have your cover, now you need to read through your entire book and pick out AT LEAST 15-20 quotes. Why? Because you need to make book teasers. Why do you need so many? Because you need them for Tuesday Teasers on your Facebook Author page, you need them for your release party and you need them for advertising, once your book is released. You can keep using the same teaser for a while, but you really want a change. The more you have to choose from, the more you can rotate them and use them for longer. If you use each teaser once, in turn, then you can go back and start from the beginning and use them 4-5 times, without people getting bored. Plus, the more teasers you use as advertising, the more sneak peeks into the book you're giving and the more people will read parts of the book that will make them want to buy it.

Making a teaser is simple, once you know how.

First off, where do you find an image? Well, here are a bunch of websites where you can find great images for free, that are totally legal to use on your teaser posters:


Pixteller

Here are some examples of images found on these sites:


And here are some stock sites, if you want to buy your images. Some, like iStock and Fotolia even take PayPal which is awesome:


Dollar Photo Club

Here's an example of some bought photos from Fotolia and Shutterstock:


~

To make your poster, choose one of these sites, to manipulate your picture with effects, font and layers, to make it more individual:


~

You can use the same techniques and websites mentioned above to make an author logo. This is a great alternative, if you don't want to use a personal picture as your Facebook profile pic. Something snazzy, cutesy, sexy or just simple. It's all up to you and your brand. Here's mine:


Why is it so big, when you only need a square? Because I can use it as a poster or crop it to suit my needs. Sometimes I keep the 'Elaine White, Author' part and sometimes I cut it out. It all depends.

I've also made logo's for each of my books. You can put it on every poster or just a few, but it brands your book, posters and makes the poster instantly recognisable.:


~

Then you're ready to share! When sharing your poster in a Facebook group, you want to give people the most information, in the fewest words possible. People don't want to spend forever reading a really long excerpt that's in paragraph form, but they are more likely to read a longer extract on a poster, if it's well presented, easy to read and pretty.

So, add your text to your poster, play around with the look and then add something like this to the text part of the comment:

Tags
Book Title, by Author Name
Tagline
Buy Link / Coming Soon
from Publisher (optional)

That's all you'll need to get your point across. It's simple, looks good and depending on the length of your link, title or tagline, it should fit on Twitter too. For tags, try things related to your book, plus use #TeaserTuesday, #SharingSunday, #SexySunday or #TBT (Throwback Thursday, which is best for older books)

Example:

#TeaserTuesday #Contemporary #Romance #SimplySexyReads

Courage in the Kiss, by Elaine White
Just how much can one girl take?


Coming Soon from Simply Sexy Reads


~

Where to share it? Try Hootsuite, which can link up your Twitter, Facebook, Google, LinkedIn and more to one account. It's free and it will allow you to post the same message to all sites or arrange where you want to share it and when. You can schedule for months ahead, as well as shorten links, with their button, and add posters.

Other than Hootsuite, these are your options for shortening your buy link, which can come in really handy, especially for long Amazon links :

Authl.it

SmartURL

Bitly

~

Now that you have that sorted, you're ready to roll with making more posters. What comes next? Well, you'll need to keep blasting that book until release.

Another way to share your work is with Thunderclap. This is really big right now, but it's tricky. You might not get it right the first time around. I didn't.

Basically, what you do is you set up a page for your book, with the buy link (a general Amazon page, if you have an existing one, or link to your FB, Twitter or website. Wherever you'll be posting the buy link, as soon as the book is live.) You'll also need a photo, but Thunderclap images are different from FB, you might have to play around with a few options, until you get it right. This is the size it will need to be. Keep it simple - like your FB cover or a teaser poster.

If you're super techie, unlike me, this is the photo requirements - 600 x 280px

If not, play around and you'll get there eventually. ;)

What is Thunderclap? Well, once you've made your page, you'll have a goal of reaching 100 supporters. You set the time and, if it's your first go, I recommend giving yourself around a month. It can be tricky to get supporters, if you don't know where to look. Which, you will, because I'm going to tell you.

Stick to the 100 and don't get over ambitious. 100 supporters is also free. How do you get those supporters? You ask for them. You'll get a link, as soon as your Thunderclap is approved and you can share that on FB, Twitter and any other site you want to. There are also groups in Facebook that are specifically for sharing your link and supporting others, who will then support you.

ThunderClap Campaigns is a closed group, but the support is awesome.

Want to know more? Check out their FAQ's.

~

Now, you're on your way. About a month before your release, either you or your publisher will post your book on Goodreads. This is super easy, if you have to do it yourself. Search for your book title and in the search results, top right corner, you'll see 'Manually Add Book'. That's what you want. You can't see it unless you search first, so this is a must.

Here, you can add your book cover, title, author name etc. Make sure you use the right name! If you already exist on Goodreads, in their author program, then you want to make sure the book is added to your profile and not someone else's. Mine, on Goodreads, has two spaces between my first and last name, because there's already someone with the name Elaine White. So to make sure my book appears on my profile, I have to put those two spaces in, when I create my book page.

If yo're adding a book to an existing series, then this gets a little bit complicated. Somehow, with one of my books, I managed it without really knowing how. But, the protocol is to create your book page first, then go into the first book in the series, click the series link (generally at the side of the title, where it says Series Name One). There, all the previous books in the series will appear and there will be a small 'edit' at the top left hand corner. Click that and you should be able to add your new book to the series.

~

Another great thing to have is a book trailer. These are really easy to make, again, if you know how. You should have Windows Movie Maker on your computer/laptop and this can be a really great, cheap, easy option to use. All you have to do is add photos and music. You can use the free or paid options for book teaser pictures, to get images, and use the same websites (pixteller, picmonkey etc) to add text, if you don't want to use the Movie Maker's caption option.

Sometimes adding the text to your image can be easier and you can use different fonts and directions. Just do this the way you do teaser posters and then add the poster/text and picture to your video the way you'd add a normal image.

Music is added the same way. Please, for goodness sake, DO NOT choose any old music from your iTunes or online. Music legality is the same as images. You can only use music that is available for legal use. DO NOT use your favourite band or any Top 40, popular music or anything that you've downloaded for iTunes, even if you paid for it. ONLY use music that can be used for commercial use.

To find valid music, try these sites and always read the legal usage rights, in case any of them have changed since writing this:

Incompetech

LinoRise

Partners in Rhyme

Free Video Footage

Taylor Hayward

Royalty Free Music

Marmoset Music

YouTube Audio Library

Always remember to add the name of the song and artist to your Credits, as well as making clear where you got your images (bought or free) and add a website link, if you're still not sure about how well you've credited things.

Book Trailers are great for adding to websites, sharing on Facebook and linking to your book on Goodreads. There are so many applications and it's always a great selling point. You can use quotes from your book in the trailer, or just tell the story in a mysterious, intriguing way that will make people want to read your book.

It's also an alternative to long passages, in the same way your teaser posters are. People will sit and watch a video, more often than they will sit and read a passage that is almost 6 paragraphs long. It looks daunting, while a video of less than 2 mins tends to make people think. "Oh, this won't take long. let's see what it's like." Even if your passage will take the same amount of time, visual stimulation is a powerful tool for authors, so use it every time you can.

~

Next? Swag. Swag is so important. You'll need it for giveaways, your release party and any random competition you do throughout your career. Have some stuff that is just general. So if you're a romance author, have some sexy/romance stuff. If you write a book about a rock star, having some guitar/singer/rock related items. Have an equal amount of general and book specific items. That way, if a last minute event crops up or someone wins a prize, you've always got something kicking around. I keep a box of jewellery, bookmarks, business cards, pens etc always hanging around, in case I need them. Oh, and have a few personalised things. Put your book cover or logo on pens/bookmarks etc and people will love them!

Good places to buy these things are:

Amazon

Etsy

Zazzle

Vistaprint

Overnight Prints

~

What's next? Well, with your book published, all your promo taken care of and your book live on Amazon and Goodreads, you're ready to rake in those reviews. The first key to getting reviews is to give copies away for free. Yes, Free! I know it seems counter-productive, since the entire point is to sell more books. But, reviews sell books.

The more reviews you have, the more people will see and notice your book. Ergo, the more books you sell. The best way to utilise this process is to get coverage on Book Blogs and Review Blogs. If you do that, you'll get your book noticed by all the readers on those blogs.

Not sure where to start? Try this book blogs:

~
Here are some review blogs that are generally great for accepting all genres and responding quickly:
~

Looking for more Author Resources? Check out my blog for:

How to Make A 3D Cover

Places to Buy Swag

Places to Find Images

Where to Find Music

Where to Find Videos

How to Fake a Facebook Profile for Your Character

How to Make Wattpad Work For You

~