Thunderclap is an awesome platform for advertising your book release, cover reveal, award nominations or a sale.
How do you do it?
First, you have to decide whether you want the free or premium version. What's the difference? It's in the detail. You get more options and more control with a premium account, as well as being able to reach a wider audience. The free account gives you most of what you need, but it depends on how much money you have to spend and how widely spread you want your campaigns.
Free vs Premium
Click
here to learn more.
~
Sign up under the Login/Register option and we'll get started.
Here's your homepage, where you'll end up when you sign in/register -
Here, in the top corner, is where you'll find your Profile. If you're just staring off, you'll want to go here first. If not, you can skip ahead to making your first Thunderclap, further down the page.
At the bottom of the page, you'll see a list of Trending campaigns, campaigns ending soon and you can also select by category, from a drop down menu.
~
To start, we'll take a look at your Profile and how to edit it and how it will look -
This is where you'll link your Twitter and Facebook profiles. The Twitter one is most important, because when your Thunderclap is approved and someone signs up to support you, they're given the option of following you by e-mail and getting updates on your Twitter account. Also, anyone who views your Thunderclap campaign will see your Twitter box on the right, giving you the option of following you that way. I'll show you an example of that later.
For now, make sure you fill out your details appropriately. This isn't for your Thunderclap campaign, but it will save you time when you make every campaign under your profile.
~
Next, let's look at what else you can click above. The My Activity box shows you all the campaigns that you've supported, your lifetime stats and how many Thunderclaps have been made in a glance.
Next up is your Thunderclaps page. For newbies, this is what it will look like.
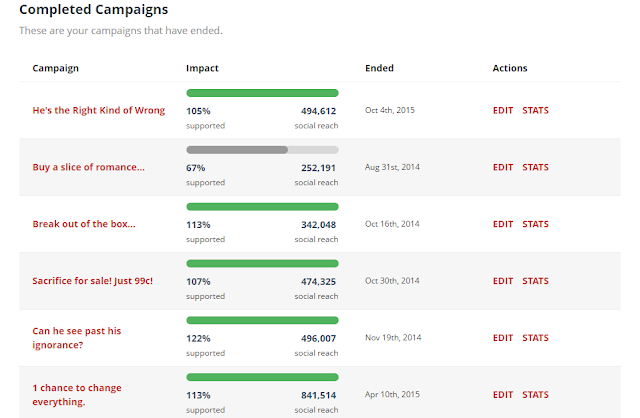
Then, if you scroll down, you'll see what it will look like once you've run a few campaigns.
This gives you all the information you could want at a glance. Now, if you've got the free version, you'll only get so much information under Stats, as shown below, but if you've got any of the more premium accounts, you'll see so much more.
I'm covering the free version, because it's the most cost-effective for Indie authors who might not have a lot of money to splash around. (Like me. lol.) Most of the stats you'll are shown as above - % supported, social reach and the date. Anything shows up as below.
~
Now, let's move on to making your first campaign.
You can take a peek at pre-existing campaigns, to get a view of how it's done, or you can go ahead and get started. I'll talk you through everything here.
Page 1
Most of the pages are self-explanatory, but I'll go through them anyway. This part is all about you, so that your supporters can see who you are and what you do. Keep it short and sweet, so that it's something people can read at a quick glance, without having to spend forever trying to find out what you do.
Here's my usual:
"Elaine White is a Scottish author, who writes paranormal romance, crime and MM romance."
Short, sweet and it lets people see where I'm from, what I write and what my interests are all at once.
Next - about your campaign
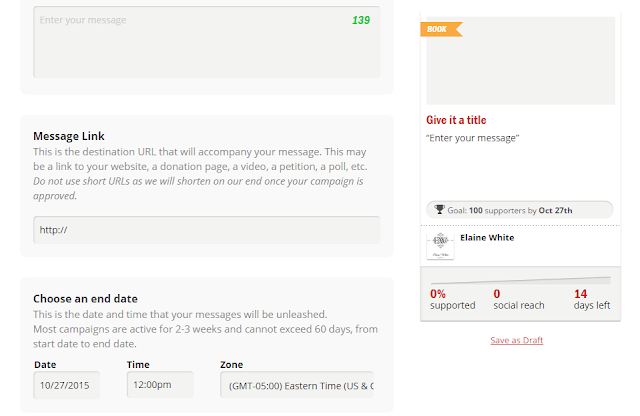
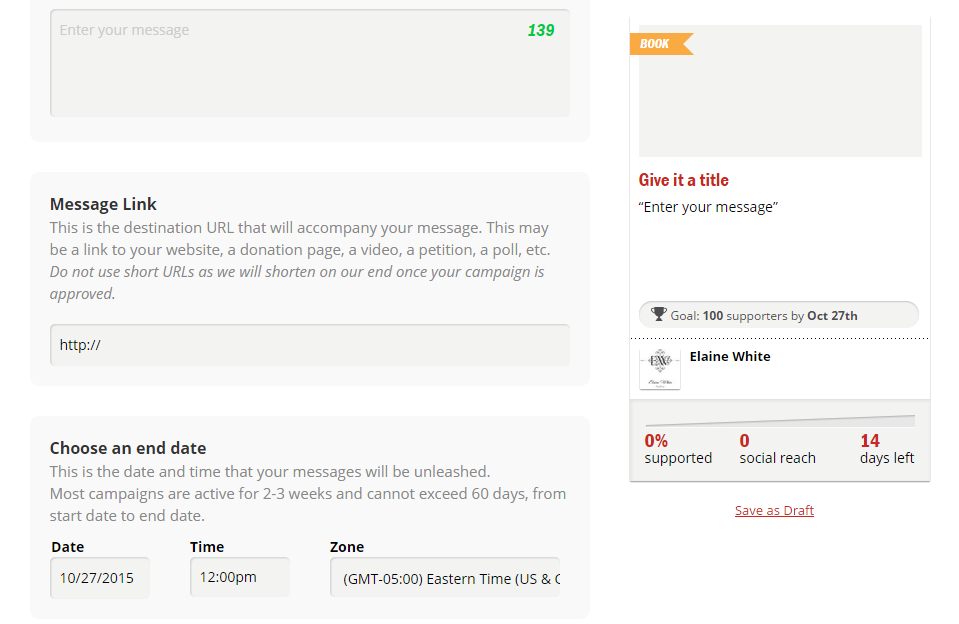
This is the important part. See that box on the right, with the Book tag? That follows you, as you scroll down the page to fill out the rest of your information. It gives you an update with each new piece of information, to show you an example of how it will look.
As you can see, your Title has a character limit. 30 characters is NOT a lot, so get to the point. This would normally be where you'd add your tagline, but even that may be too long. I tend to play around with options, until I get it right. Sometimes that takes a while, but it's best to get it right. The one thing you DON'T want is to have your message cut off, because it's over the limit. Since I've never tried this, I can't tell you if it would post or warn you that it's over limit, but it's best not to tempt fate.
Beneath that, you have to select your category. Now, this isn't like an Amazon category, where you can pick 2 or 3 or even pick a sub-genre. If it's a book, say book. If you're a musician, say Music. You don't want to be advertising yourself as the wrong thing, because it will get confusing for supporters. Also, your campaign will show up on Thunderclap's home page, right down the bottom, where the give you a drop down menu to view campaigns by. (see above)
Now, onto the message. As with your Title, this has a character limit, so make it punchy and feel free to add hashtags, if you want. Sometimes they can let you say a lot without many characters. But also make sure that your message looks nice, isn't in text speak and inspires people to click that link.
Your message link is tricky. If you don't have your final buy link, then feel free to add a general link - website, Amazon author page. You can make a SmartURL with a link to all your international Amazon profiles (
see here on how to do that) or just insert your US/UK Amazon profile. The key thing here is that once you have your buy link - as long as its before your Thunderclap goes live - you can update it! Which is awesome!
Sometimes Amazon takes a while to load a book, especially if you've had a last minute update before release day, because of edits or whatever else. For this reason, when you reach the End Date option, again try to make it well timed. If you're not sure the book will go live on release day, then make your Thunderclap end a few days later or a week or two.
~
So, how does planning your end date work?
Your end date is when your Thunderclap will go live. Your post will NOT repeatedly post between your start date and end date. It will only post ONCE, at the time on the day you specific. So, if you want your post to go live at 12pm on the 1st of December, then choose those options.
When it says "Most campaigns are active for 2-3 weeks", that refers to the time it takes to gather your 100 supporters. But we'll go into that more later.
Now...REALLY important...your Thunderclap will NOT instantly be available to share. Once you've clicked Create and Continue, it will be submitted to Thunderclap for approval. This is generally just to make sure it's nothing obscure or porn related. I've seen a lot of erotica books been passed, so as long as you're sensible, it shouldn't be a problem. It generally takes 1-3 days and some are quicker than others for being approved.
For this reason, try to give yourself AT LEAST 2-3 weeks to gather your 100 supporters. I generally give myself a month. This gives you time to share your link (provided in your confirmation e-mail) to a dozen different social media sites over time, share it in the
Thunderclap group on Facebook, which is a great way to get supporters. It's all about sharing Thunderclaps and supporting other people in return.
~
Once you've filled out that page, we move onto the next.
Your supporter goal is important. This is how many people you'll need to get your campaign from Active to Completed. Like the message says, Be Realistic, so opt for 100 for your first campaign. If, later, you've consistently reached over 250 supporters on a 100 supporter campaign, then you can move your next campaign up to the 250 supporter limit. If not, you'll generally find that 100 is enough. It's hard for an individual author to get more than the 100 supporters needed for the first level campaign.
Next up, you need a campaign photo. This can be as tricky as the Title. The image is shorter than a FB cover photo, so you might have to play around with a little or go to Picmonkey (how to post here) and use the Create and Custom options to make your canvas 600 x 280. That will give you the image size and you can use layers to get your pictures added onto the canvas.
Now, you get to add the blurb or your story, or a synopsis into the "Edit Your Story" box. This one doesn't have a word/character limit, so go ahead and put in whatever you want. Feel free to add your website and social media links at the very bottom, because there won't be anywhere else to add them.
If you've updated your Profile, the E-mail and Twitter boxes will automatically update.
When you're happy with how your message looks in the box on the right, click the Create and Continue.
Now...REALLY important...your Thunderclap will NOT instantly be available to share. Once you've clicked Create and Continue, it will be submitted to Thunderclap for approval. This is generally just to make sure it's nothing obscure or porn related. I've seen a lot of erotica books been passed, so as long as you're sensible, it shouldn't be a problem. It generally takes 1-3 days and some are quicker than others for being approved.
This is a great reason to give yourself a month to gather your supporters.
~
After your Thunderclap has been approved, this is a version of what you'll see.
This is what everyone will see when they click on your link to support you. When they get here, they can choose to support ONLY with Facebook, Twitter or Tumblr, or they can choose a combination of them or all three. That's up to your supporters. I have all three social media sites, so I always support with all 3, but other people might not have a Tumblr or Twitter site etc.
Then, once you've shared this and reached your 100 supporters, this is what you'll see.
~
The great thing about Thunderclap is that you get a daily e-mail to tell you how many supporters you've reached overnight/during the day and how many more you need. That way, if you spend a day or two getting no supporters, you know to post it again and ask for more shares.
Then, once you've reached your 100 you get an e-mail to let you know it's "Tipped", in other words, gone live.
Feel free to keep advertising/sharing it after you've reached your 100 supporters. It will not show as Completed until it's gone live. That means you can keep gathering support as long as you haven't reached your post date yet.
~
CONGRATULATIONS! You've now completed all the steps for how to use and make the most of Thunderclap.